| Navigation |
|---|
| Tutorials |
|---|
| LithUnwrap |
|---|
LithUnwrap 1.3 howtoFor noobies by a noobie.LithUnwrap is used to skin a 3D model. Before you can make the skin in a 2D graphics program, such as MSPaint, Gimp, Photoshop or Paintshop Pro, you need to “unwrap” your 3D model to make it flat and 2D. You can download everything you need for this tutorial here: Unwrappin'.
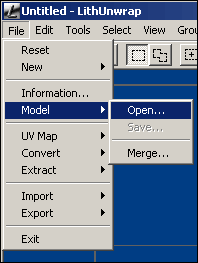
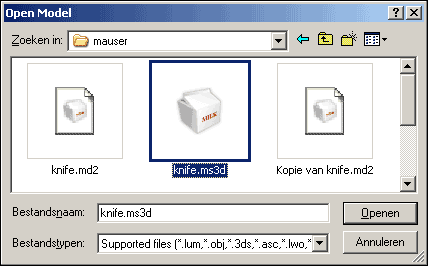
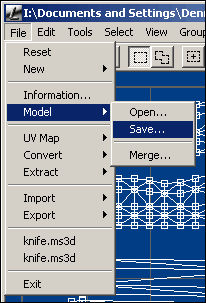
To load the model, click File > Model > Open... Then select your model in the dialog box.
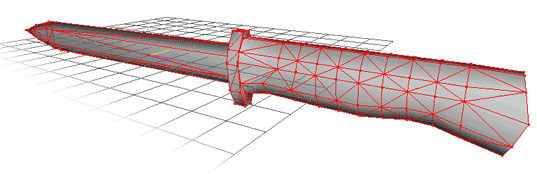
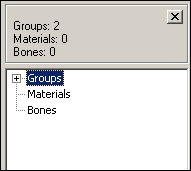
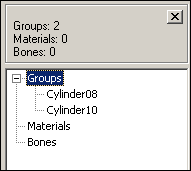
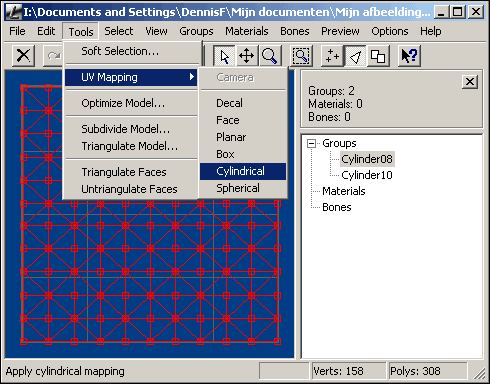
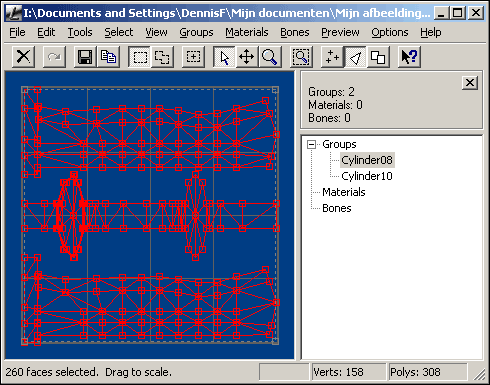
As you can see, LithUnwrap supports a series of formats. I'm using the Milkshape 3D format .ms3d, since I've used that to model the knife. The other file formats supported are Wavefront .obj, 3D Studio .3ds, 3D Studio ASCII .asc, Lightwave .lwo, DirectX .x, AutoCAD .dxf, Truespace .cob, Vampire TM:R .nod, Quake1 .mdl, Quake2 .md2, Quake3 .md3, Revolt .prm, 4x4 Revolution .smf, Freespace 1/2 .pof, Descent3 .oof, Homeworld .peo .geo, ST Armada .sod, Black & White .l3d, Serious Sam .mdl, Jedi Knight .3do, Genesis 3D .act .bdy, Half-Life .mdl, The Sims .skn .bmf, RTCW .mdc, 3D GameStudio .mdl and Nendo .ndo When you load the model the screen will look like this: This is a 2D representation of your 3D model. All the faces are placed all over the workspace. You can't tell which faces represent which part of the model just by looking at the faces and vertices like this. We will have to rearrange them so that we can see the parts. First, let's see how many groups our model has by clicking on the plus next to "Groups" on the right side of the screen. It will look like this: This tells us that the model is made in out of 2 groups (just for your information, the blade and handle of the knife are seperate groups). If we click on a group, it will select all the faces that are in that group. These will show red. Also, the other faces are gone. This is to help make the model clearer. If you click on the other group the current faces will dissapear and the new ones will be shown red. Let's rearrange the faces of Cylinder08 first. We're going to try and get a recognizable shape on our workfield. As said before, our model exists primarily out of Cylinders. Therefor, we click on the menu Tools > UV Mapping > Cylindrical. If the selected group is made out of a box shape you could try Box instead of Cylindrical. It there are round objects on your model, try out Spherical. You should make some models using the shapes listed here and try out some of the options. Play with it to get a good feel of these options.
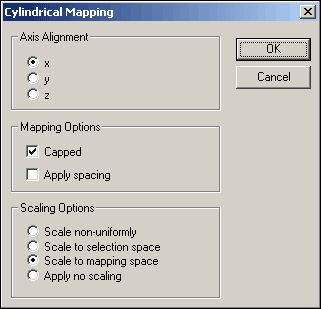
The dialog that follows gives us options on how we can unwrap it Cylindrically. I'm not sure what all these options mean, as this is a noob guide made by and meant for noobs. The settings that we need for this knife are shown on the screenshot below. Axis Alignment: x All other options are ticked off or unselected.
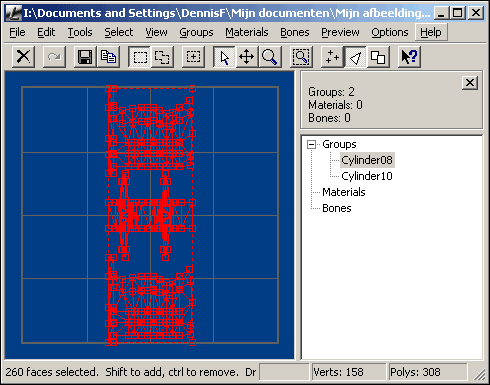
This will show us the following screen (note that if you have the window maximized it will be MUCH MUCH clearer and you will definately see the shape). Now you should see a sideview of the handle of the knife on top and bottom along with a back and front view in the center. We should probably scale things up, to make it a little better.
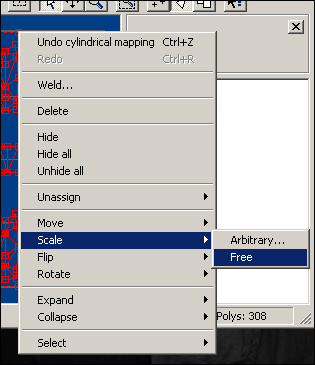
To scale a selection, right click on the selection, then go to Scale. Here you have 2 options: Arbitrary and Free. Arbitrary uses values to scale your selection. This comes in very handy when you have your UV Mapping just right, but you need to change it's scale a bit. The Free option let's you grab the corners of the selection and drag to scale.
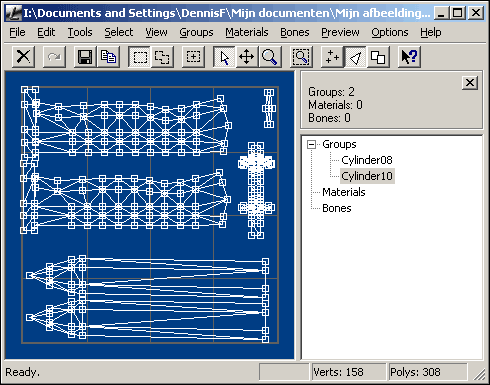
If you select Free, the corners of your selection will become green (low quality gif image shows it grey, don't be fooled). On the screenshot below you can see the handle being laid all over the workspace. You can definately recognize the handle but the way that I've unwrapped it isn't good. The shape of the unwrap is great, but there is no room for the blade of the knife. This is where Arbitrary scale comes in handy.
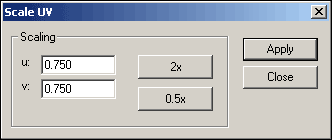
To scale it Arbitrarily, right click the selection, then go to Scale. Now select Arbitrary. You will get a dialog box. If you enter numbers in the textbox it will scale to that. If you want your UV to be scaled equally you should enter the same number in each textbox. You can also double the size of the UV by clicking 2x and you can half the size by clicking 0.5x. In my case I'll be sizing it down to 3/4 of the original size. Enter the values and click Apply just once. If you clicked one time too many, click Close and undo the last action by clicking the Edit menu. After the scaling, click Close.
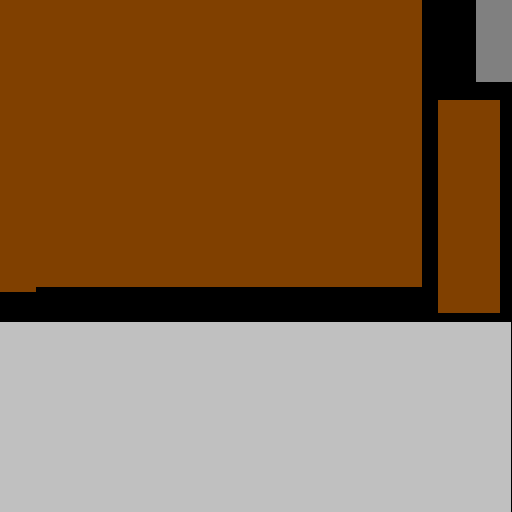
We need to do 1 more thing before we unwrap the other group. After the scaling the UV will be placed in the center of the workspace. Just click on the selection and drag it to the upper left corner. That gives us some space to unwrap the other group. I'm going to let you do the other group all by yourself. This way you will get a hang of it quicker than just following these instructions. The method of working shouldn't be any different than the first group. Good luck! Hint: to work easier to lay out the second group, unwrap it first, then after the unwrapping right click on Groups and untick Autohide. ... Done already? Let's continue.By now your UV map should look something like this. It could be totally different, though, as long as parts don't overlap, everything is ok. My unwrap is not the best of all, because as you can see, there are still large gaps of unused space left.
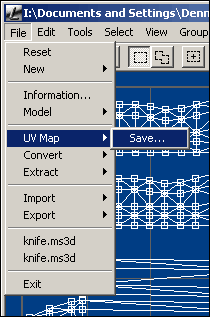
Now we can save the UV so that we can draw our skin over it. Use your favorite image editor for this. The dimension for this UV is something that I can't decide for you. Just note that higher dimensions mean higher resolution skins. 512x512 is not bad for a skin. Lower resolution skins (for older game engines for example) should be more like 128x128. The saving of the Bitmap depends on your personal taste. If you like the groups to be colored, select Color. If you like it to show the lines of the faces along with the colors, select Color and outline. Black and white shows a black background and white lines. Now, open the file that is saved in your favorite image editor and draw the colors (or cut and paste from the original image and scale it so it fits between the lines).
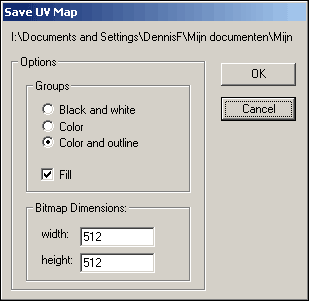
This is my skin, a fine piece of art, if I say so myself. The handle is made brown, and the blade is grey. Perfect. If you compare this with the UV map I've made you will see that I've covered all the parts perfectly.
As you can see, the black parts on the UV is wasted space.
You are done skinning your model now. All you need to do is save your skin to a format the engine understands and save your model to use this UV layout. You can also save the UV layout seperately and then import it into your 3D modelling program by going to File > Export.
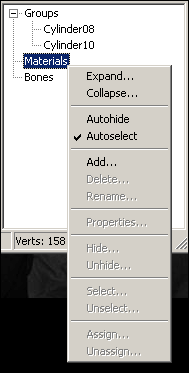
Viewing of the skin using LithUnwrap.You can always view your skin and model from the program itself of course. First, right click Materials and select Add.... This will create a new material named Untitled. Right click this and select Properties.
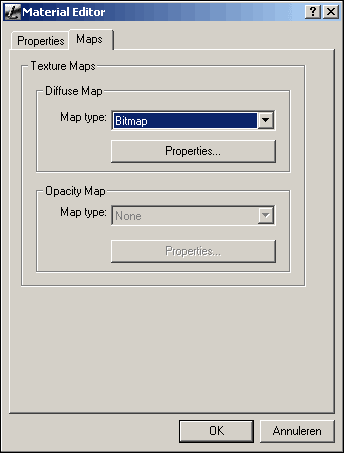
In the dialog that follows, go in the tab Maps. In the first dropdown box, select Bitmap and click on Properties.... In the next dialog click on Change... and select the skin that you've made. Afterwards close all the dialog boxes by clicking OK.
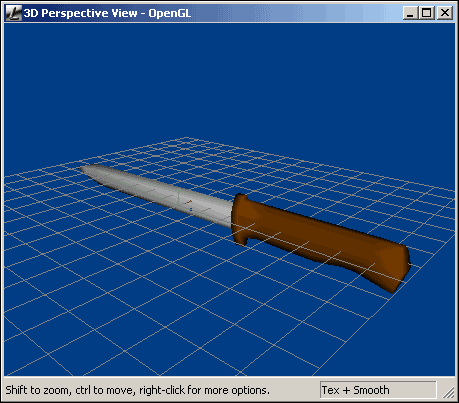
Next, click on the menu Select > All (or CTRL-A). Right click the material Untitled again and select Assign. Finally, click on the menu Preview > Show Model. Tadaa!
This is the same knife, which I've unwrapped and skinned before as a test.
- !nFerNo |

| Learning Information |
|---|
| Remember, you'll need to have a lot of patience! |
| Changelog | Credits - ddaynormandy.com © 2007 - Dennis "!nFerNo" Felix - February 11, 2007 |